Nebraska Project WILD

CONSIDER THIS YOUR INVITATION TO GO OUTSIDE!

September 30, 2013

Filed under: Uncategorized — projectwild @ 3:49 PM

Be Your Own Weather Man

With fall underway, the weather is constantly changing. With the temperature switching from 50’s to 80’s and everything from rain to sleet to snow falling from the sky, it can be hard to trust the predictions of the weather channel from day to day. It can be even harder to get your kids to appropriately dress themselves for the weather. Still trying to hang on to summer, they tend to head outside in shorts and a t-shirt regardless of what you or the weathermen say. A way to get your kids to be more weather conscientious, and get them excited about the changing seasons, is to set up your very own weather station and track the changes for yourselves through daily observation!

First, make a chart to keep track of all your data. On a large piece of paper, make horizontal columns and label them “temperature,” “rainfall,” “air pressure,” “wind direction,” and “clouds.” Mark the dates along the vertical side of the chart.

Next, find a place outside to place your weather station, and hang up a thermometer for temperature monitoring. Now depending on how much information you want to collect you can make any number of the following weather instruments to help your child follow the rules of Mother Nature through observation and data collection.  

Making a…

Homemade Rain Gauge

Place a piece of masking tape from the upper rim to the base of a clear jar or plastic cup. Use a ruler to mark off measures in quarter-inches or centimeters on the tape. Set the jar outside and wait for it to rain. After a storm, check your rain gauge to see how many inches of rainfall you received.

Image

Wind Vane

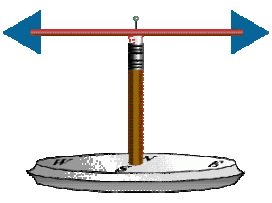
Fill a paper plate with small rocks. Flip and place another paper plate on top and tape or glue the edges together to make a base stand. Mark north, south, east and west on the top plate. Insert a new pencil into the center of the base, eraser end up. Attach paper arrow to either end of a drinking straw. Push a straight pin through the straw’s center point and into the pencil eraser. Watch the movement for signs of wind direction. 

Image

Barometer

Make a barometer to watch the air pressure rise and fall by cutting off the neck of a balloon and stretching the remaining piece over an empty glass jar (a pasta jar works well). Secure it with a rubber band. Now you have trapped the air inside the jar.

Cut the end off a drinking straw to make a point, and tape the other end to the top of the jar. Attach a piece of cardboard to the back of the jar, and mark a line on it where the straw is pointing. This is your starting point. As the air outside the jar changes, the straw will move above or below the line on the cardboard. If the air pressure is high, it will push down on the barometer, causing the straw to move above the line. If the air pressure is low, the straw will move below the line. Record the air pressure in your weather chart by drawing an arrow moving up (high), down (low), or even.

Image

Not too sure how to describe the concept of air pressure with your kids….? To demonstrate air pressure, blow up balloons and let them go. Explain that the air you blow into the balloon pushes presses on it. The air pressing on the sides of the balloon makes high air pressure. When you let the air go, the pressure inside the balloon is low.

When the air pressure outside is high, it usually indicates a clear day. When the air pressure is low, it means cloudy weather is on the way.

 

Going on Safari at Home September 24, 2013

Filed under: Uncategorized — projectwild @ 4:24 PM

Feel like going on safari but can’t afford it? Never fear! As a kid I always dreamed of days in the African plains surrounded by wild cats and hyenas, and spent a good deal of time with a safari hat on chasing my pets around the house, and peering at them from behind a couch or chair. Through all of my pretending not only was I working on being patient (a skill that has served me well in the field of wildlife biology) but, unbeknownst to me, I was getting to know animal behavior. Although our family pets seem tame, they are descended from wolves, wild cats, and the like and share many behaviors with their wild counterparts.

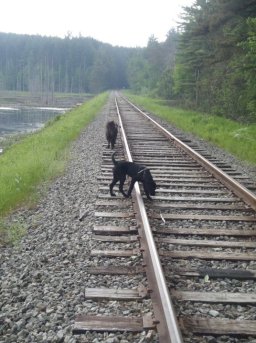
            Next time you go for a walk with your dog look closely at how they move around, what they sniff at, where and how they mark their territory. As someone who has gone on a walk with a wolf before, it is uncanny how similar they are. But the similarities don’t stop with their movements. All of us dog owners know that when you come home and your pooch is cowering in the corner ears back and averting their large puppy dog eyes away from you, you’re about to walk upon a room in a less than desirable condition. This submissive stance that your dog takes is a behavior that wolves practice in their pack when in the presence of an alpha wolf.

ImageCormac and Ellie sniffing out the tracks


Now for those of you cat lovers it’s even easier to see how your frisky feline could have been a wild cat. All you have to do is play a game of attack the feather or yarn ball to see the quick reflexes and hunter mentality in these pets.

ImageNapkin getting ready to pounce


So next time your son or daughter asks you to go on an African safari or to the zoo, strap on a safari hat and venture out your back door to become part of a wolf pack, or stay inside and try to mimic the movements of your favorite feline to become the ultimate hunter. 


Backpack Essentials September 19, 2013

Filed under: Uncategorized — projectwild @ 11:53 AM

It doesn’t take much to get children interested in nature and wildlife. It seems to be a natural instinct. But there are a few ways that we can enhance their curiosity of nature, using a few inexpensive, simple tools. For instance, a backpack.

What child doesn’t like to pretend they are an explorer? Climbing the tallest rock, or running through the open prairie, even peeking into a dimly lit cave. Well, to be an explore you need tools. A backpack is something almost everyone has and is easy to carry around while exploring.

Here are a few, inexpensive, simple tools that children can take with them while exploring.

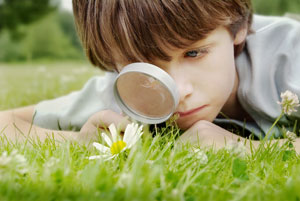
Magnifying Glass: This is great for looking at insects. We all caught insects as little ones and we can see features with our eyes, but not the detailed hairs on the legs, or the eyes, the antennae, the hooked toes and spines. This is a great way to highlight the fine details and will help them use their observation skills.

MagnifyingKid

Small Bucket, or Container: This simple tool can be great for children to catch and release. We all want to see something up close, but may not know how to contain it. This can be an easier way for children to stop and look at what they caught. Just remember to release when you are done looking!

Camera: Kids love cameras! This is a fantastic way to let children have responsiblity. Let them take pictures of their wildlife finds, or anything they find picture-worthy. This can also help adults figure out what peeks your child’s interest. This doesn’t have to be an expensive camera, remember, just one that is user friendly and light to carry.

Nature Journal: What exploring trip would be complete without a nature journal to write or draw everything they find? Go out and buy an inexpensive journal that they can use. These by no means have to be detailed entries, but could even be sketches or thoughts about what they find. Also, provide children with pencils, and different colored pens or markers as well.

journal

Binoculars: Many animals can be seen, but a lot can only be seen in the distance. Having binoculars handy in the backpack is not only a great way for your child to enjoy their animal discovery but also allows them to spy more wildlife that they wouldn’t have seen with their naked eye! Again, these do not have to be expensive binoculars, get ones that are child friendly and ones that are not large on their face.

Now grab your backpack and explore!!


Classification with Legos! September 17, 2013

Filed under: Animal Information,Nature Activities — projectwild @ 4:45 PM

Okay, admit it! Your favorite toy as a kid wasn’t a Barbie Doll, or your Hot Wheels, it was your Legos! I’ll be the first to admit that I actually still have my Legos in a Rubbermaid tub in my basement. Why you ask? Well, so I can give my kids the same joy that I had. Whether you are a boy, or a girl. Whether you were 5, 12, or 15, Legos were the bomb!

Enough about how cool Legos were, let’s talk about some different ways that we in environmental education can actually use the Legos in something else besides building cities, planes or fantasy worlds.

A topic that is used everyday whether you realize it or not is Classification, or grouping items based on similar characteristics. Such as, items that are rough, items that are smooth, items that are red or items that are blue. (Yes, I just pulled a Dr. Seuss there.) Classification plays a major role in animal species. We know that each animal and living thing has a special title called its “scientific name.” This is a way scientists can keep each animal separate. But, let’s face it, kids do NOT care what the scientific name of a Bullsnake is, they just want to see the snake and observe it.

So, to help teach your kids about classification at a young age, use Legos. Let me show you how. Take a few of the larger sized Legos, and a dry erase marker. Write different types groups of animals on them. (Birds, Mammals, Fish, Insects, Reptiles etc.) Then take a lot of the smaller Legos, and write detailed animal names (Grasshopper, Snake, Owl, Deer, etc. ) Then have kids figure out what categories to put them in. They are learning classificaton but are using a toy, that many people have.

lego-animal-classification

For younger kids you may want to start simpler. Like, intstead of categories like mammals, birds, reptiles, etc. Do things like flies, swims, has 4 legs, has 6 legs, etc.

For older children use labels like omnivore, carnivore, herbivore, etc. The possbilities are endless. Also, when you are done, you can wipe away the marker, and your Legos will not be ruined.

lego-animal-classification


Snacktivities September 16, 2013

Filed under: Crafts,Educator Resources,Nature Activities — projectwild @ 4:56 PM

Snack time is an integral part of many early childhood environments. Here are some fun ways to incorporate healthy snacks into a nautre- oriented time slot. Fruits, vegetables, and whole grains are used whenever possible, and some snacks can even be prepared by children as craft projects. You can learn, have fun and eat…everyone wins!

Here is a classic snack that I’m sure everyone has tried at least once. If you haven’t here is your chance! Use this snack to talk about ants. What do they do for us? Why should we care about ants? Well ants, are pollinators, they help make food we eat and they are actually very social animals. They live in colonies and they communicate through their antennae!

Ants on a Log

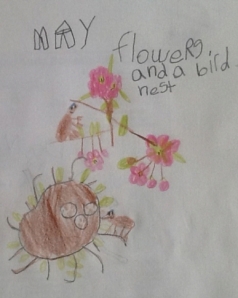
Bird Nests are a great way to transition into a bird topic. Talk about different types of nests and what birds use them. Some birds make a ground nest like a duck or a turkey. Others have pendulum nets like an oriole. Others even live in the cavity of a tree like owls!

birds nests

Trees are such an important part of our life. They provide us oxygen and provide many animals with a home. Take your snack to a room with a window by a tree and see how many animals you can count that come to the tree or live there. (birds, ants, bees, insects, fungus, other plants, raccoons, etc.)

tree snacks

Okay, so you can’t have a healthy snack ALL the time. Sometimes you NEED chocolate. Have your kids make these dirt cups and talk about compost. Maybe even start your own compost bin in your house. Also, talk about worms. Worms help plants grow and help the soil so you can garden.

dirt cups

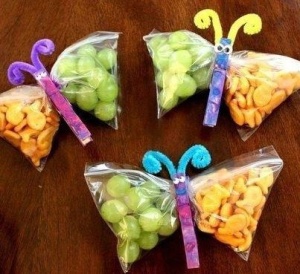
Here are some other cute ideas. Make your own topics up to use these snacks as education. Bon Appetite!

snack bags

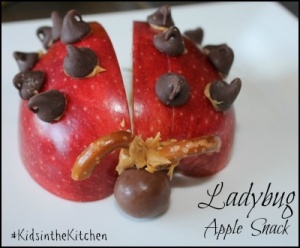
Ladybug Apple snack


Fluttering into Fall September 5, 2013

Filed under: Uncategorized — projectwild @ 11:06 AM

Although many of us are still experiencing the summer heat, fall is just around the corner and many animals are already getting ready for the impending winter that will follow closely behind. Many of these animals are beginning to fatten themselves up in preparation for hibernation, while others are gearing up for a long migration. When thinking of migration our minds usually go right to birds, but there are those in the insect world who are also gearing up for their journey ahead. One insect in particular, the Monarch Butterfly will travel up to 2,500 miles to escape the frigid winter temperatures. Monarchs are among several species of butterflies which just can’t stand the cold temperatures of winter, and will be in peak migration through Nebraska around September 16th, so keep your eyes open and your flower gardens watered to help them as they continue on their long migration southward.

Image

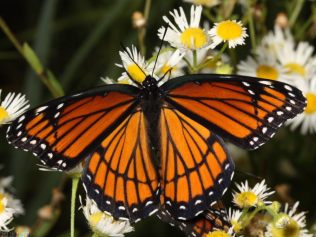
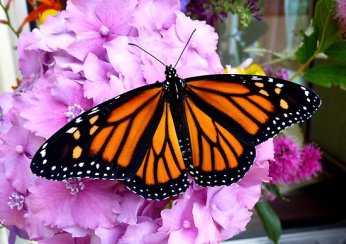
Now to the untrained eye the butterfly above looks like a Monarch…But in fact this is a completely different species known as the Viceroy which you can also see fluttering around this time of year. Now take a closer look at the picture above and the picture of the Monarch below and see if you can spot some subtle differences.

Image

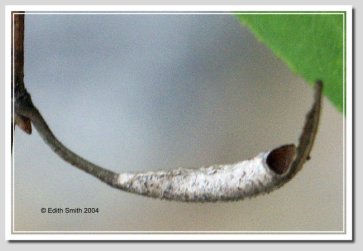
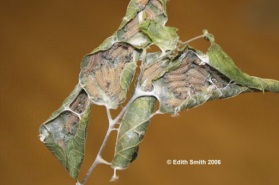
Other than just their features the Monarch and Viceroy differ in how they spend their winters. Where the Monarch is gearing up for migration, the Viceroy is still flying around flower gardens, sucking up nectar and laying its eggs. In fact, the larvae from these tiny eggs will actually overwinter right here in Nebraska! Viceroy caterpillars will find a willow tree, pick out a leaf, eat all but a little bit of it, then create a sleeping bag of silk in which it will remain until temperatures begin to warm up again in the spring.

Image

As fall continues, be on the lookout for these “hibernacula”, formed by numerous insects to last out the winter. Some examples are below…

ImageImage    Image